
If you’ve put years, or even weeks of hard work into your blog, then you’re going to want to back it up. You know …. just in case!
There could be a server failure, maybe you accidentally delete your blog, or perhaps you’ve been falsely reported for violating Blogger’s terms of service and you’re shut down. It happens.
If you have a Blogger blog, then follow along. It’s super simple.

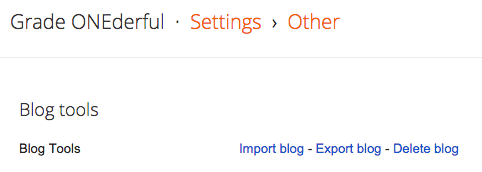
1. Go to your dashboard. See the little wrench on the bottom left? That’s your “Settings”. Click on it.
2. When you click on “Settings” it will open a fly-down menu. Click on “Other”.

3. Now you’ll be looking at this image. Just click on “Export blog”.
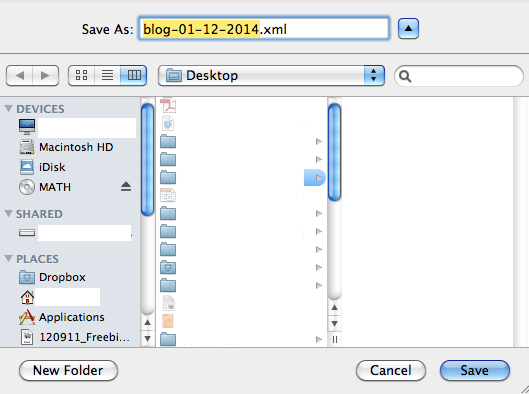
4. This pops up next. All you have to do is click “Download Blog”.

5. After you click “Download Blog” you’ll be given the option of where you’d like to save your blog copy. You can save it to your desk top, hard drive, wherever you like. I usually change the title so it’s a little more specific. For example, I’d add GO or GradeONEderful to the beginning because I have several blogs. Be sure to keep “.xml”.
If anything happens to your blog you now have a copy of your posts. To upload them you just repeat the first two steps. In step 3 be sure to click on “Import Blog”, then upload the copy you’ve saved.
Don’t forget to download a new copy every couple of months or so.
Hope this is helpful to someone. Have a great day!
JOIN THE NEWSLETTER! NEVER MISS FREEBIES & UPDATES
Super helpful! Never thought of doing that! Renee The reading corner
That's great! I'm glad it's useful:)
Thanks, Barb! Just did it–never would have thought of it!CrystalTeaching Little Miracles
Awesome! Glad to hear, Crystal.
I've known for a long time that I need to do this, but never have. Thank you for the super helpful directions! LoriConversations in Literacy
So quick and so easy! Thanks!TaraThe Math Maniac
You're welcome, Lori!
You're welcome, Tara.Now I need to do it, too! haha!
Helpful to me – thank you 🙂
I still need to do this. Thank you for posting your tutorial again!ChrissyFirst Grade Found Me
No problem:)
You're welcome! We could remind each other once a month…I always have troubles remembering to back up my own blog!
Always PrimaryThanks for the excellent step-by-step instructions. I've been meaning to do this for a long time. I did my template while I was at it!Enjoy the rest of your summer holidays.
You're super welcome, Debbie!